> For the complete documentation index, see [llms.txt](https://sharinghub.kittenbot.hk/llms.txt). Markdown versions of documentation pages are available by appending `.md` to page URLs; this page is available as [Markdown](https://sharinghub.kittenbot.hk/airelated/koi2/koi2makecode/koi-2-yu-makecode-kuai-su-ru-men.md).
# KOI 2與MakeCode快速入門
## **接線方法**
### **1. 與Robotbit EDU 組合使用**
使用隨盒附送的4pin 線, 白色大插頭插入KOI 中
Robotbit Edu上已經提供了4pin的通訊連供電接口,我們只需要將KOI連接到通訊接口(如下圖)就可以了。
由於Robotbit Edu的通訊接口使用了P2與P12,我們在MakeCode裡面就要相應地選擇引腳。
注: 如欲為KOI 2以USB 方式額外供電, 請拔走黑 (GND) 及 紅(5V) 2跟線。
 {% hint style="info" %}
KOI的RX接口(黃色線)接到Robotbit的TX接口(P2)。
KOI的TX接口(藍色線)接到Robotbit的RX接口(P12)。
{% endhint %}
{% hint style="info" %}
KOI的RX接口(黃色線)接到Robotbit的TX接口(P2)。
KOI的TX接口(藍色線)接到Robotbit的RX接口(P12)。
{% endhint %}
 ### **2. 與Robotbit 2.2 組合使用**
使用隨盒附送的4pin 線, 白色大插頭插入KOI 中
另一端參考下方接線圖
黑 - GND
紅 - 5V
黃 - P2 (TX)
藍 - P12 (RX)
但用家必須**注意**, 在接駁4條杜邦線時, 要格外留意**5V** 及**GND** 的插線,
## **xxx 切勿反接 xxx**
否則KOI 2有機會不能再運作了 >.<
```
黃色線只可以接類比引腳(Pin0-2)!使用Pin0的話請拔除蜂鳴器跳線帽。
```
### **2. 與Robotbit 2.2 組合使用**
使用隨盒附送的4pin 線, 白色大插頭插入KOI 中
另一端參考下方接線圖
黑 - GND
紅 - 5V
黃 - P2 (TX)
藍 - P12 (RX)
但用家必須**注意**, 在接駁4條杜邦線時, 要格外留意**5V** 及**GND** 的插線,
## **xxx 切勿反接 xxx**
否則KOI 2有機會不能再運作了 >.<
```
黃色線只可以接類比引腳(Pin0-2)!使用Pin0的話請拔除蜂鳴器跳線帽。
```
 **重要事項: 黑 (GND) 及 紅(5V) 切勿反接!!!**
再次*檢查接線無誤* 後, 就可以打開Robitbit 的開關, 便會看到KOI 的屏幕顯示鏡頭畫面。
**重要事項: 黑 (GND) 及 紅(5V) 切勿反接!!!**
再次*檢查接線無誤* 後, 就可以打開Robitbit 的開關, 便會看到KOI 的屏幕顯示鏡頭畫面。

 ### **3. 使用Armourbit**
接線系統上, Armourbit 相對簡易便捷, 只需把2頭都是白色4芯插頭的接線 (Cable C), 分別接到KOI 2 及Armourbit (Port 2) 上便可以了。
註: Cable C 並非KOI 2 的標準配套件, 訂購時請註明需求。
### **3. 使用Armourbit**
接線系統上, Armourbit 相對簡易便捷, 只需把2頭都是白色4芯插頭的接線 (Cable C), 分別接到KOI 2 及Armourbit (Port 2) 上便可以了。
註: Cable C 並非KOI 2 的標準配套件, 訂購時請註明需求。
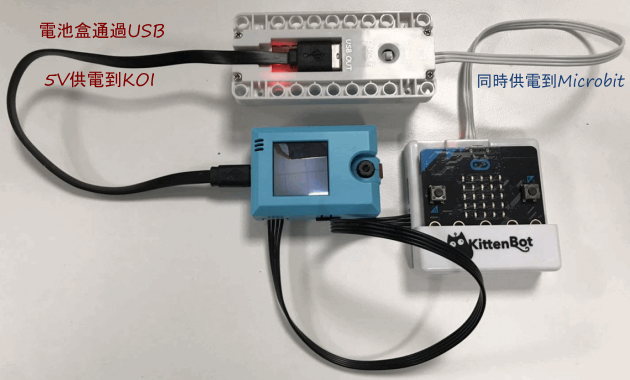
 Armourbit與KOI配合使用時,KOI必須額外提供5V電。
大家可以從Armourbit的電池盒, 以USB介面進行引出(如下圖)。
Armourbit與KOI配合使用時,KOI必須額外提供5V電。
大家可以從Armourbit的電池盒, 以USB介面進行引出(如下圖)。

 然後在程式裡面只需要使用初始化Armourbit的積木然後選擇相應的接口(範例接線為Port2)就可以成功連接KOI 2。
 ## MakeCode插件快速解說
### 加入MakeCode插件
成功接線後就可以準備編程。
插件地址:[**https://github.com/KittenBot/pxt-koi2**](https://github.com/KittenBot/pxt-koi2)
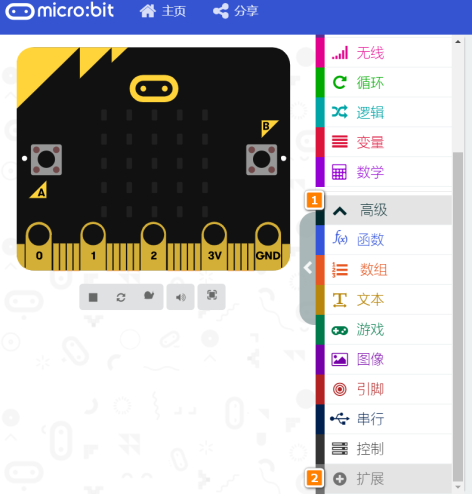
在MakeCode打開專案,點擊擴展一頁。
## MakeCode插件快速解說
### 加入MakeCode插件
成功接線後就可以準備編程。
插件地址:[**https://github.com/KittenBot/pxt-koi2**](https://github.com/KittenBot/pxt-koi2)
在MakeCode打開專案,點擊擴展一頁。
 在搜尋欄輸入koi 2。
 加載成功後,積木欄會新增koi2的積木。
 #### 1. 初始化
 初始化Micro:Bit與KOI 2的連接, 必須加入每個程式中。
#### 2. 基本積木
初始化Micro:Bit與KOI 2的連接, 必須加入每個程式中。
#### 2. 基本積木
 KOI 2的基本功能,包括拍照錄音按鍵等。
#### 3. 模式選擇
KOI 2的基本功能,包括拍照錄音按鍵等。
#### 3. 模式選擇
 選擇KOI 2的運行模式,進行任何AI功能之前都必須選擇相應模式 (同時間只能運行1個模式, 可通過按鍵編程轉換模式)。
#### 4. 人面屬性類
選擇KOI 2的運行模式,進行任何AI功能之前都必須選擇相應模式 (同時間只能運行1個模式, 可通過按鍵編程轉換模式)。
#### 4. 人面屬性類
 #### 5. 人面口罩追蹤
 #### 6. 色塊追蹤
 #### 7. 線條追蹤
 #### 8. 機器學習 圖像辨識
 #### 9. 預載模型 路牌追蹤
 #### 10. 預載模型 數字追蹤
 #### 11. 預載模型 物件追蹤
 #### 12. 掃碼類
 #### 13. WiFi物聯網類
