> For the complete documentation index, see [llms.txt](https://sharinghub.kittenbot.hk/llms.txt). Markdown versions of documentation pages are available by appending `.md` to page URLs; this page is available as [Markdown](https://sharinghub.kittenbot.hk/airelated/koi/makecode/koimakecode.md).
# KOI與MakeCode快速入門
### **快速入門**[¶](broken://pages/ZvCKyUY1YA994l3hZnao)
### **連接Micro:bit**[¶](broken://pages/ZvCKyUY1YA994l3hZnao)
#### **1. 與Armourbit 連接**[¶](broken://pages/ZvCKyUY1YA994l3hZnao)
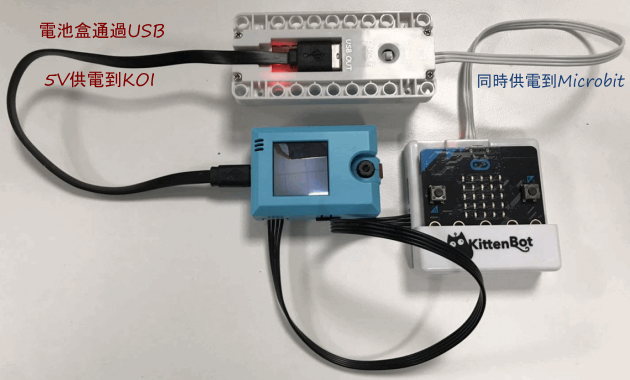
因為接線系統上, Armourbit 相對簡易便捷; 小編推薦新手使用Armourbit, 這樣可以減少因接線失誤而導致白忙半天呢\~
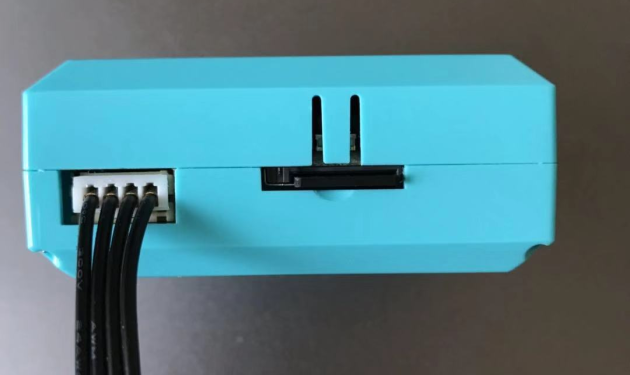
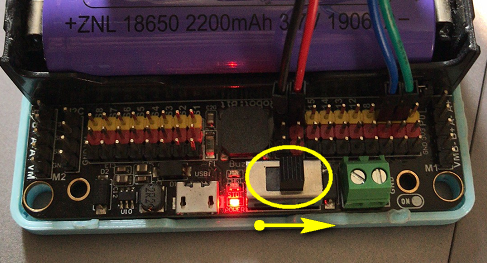
Armourbit與KOI配合使用時,KOI必須額外提供5V電。
用家不用擔心, 大家可以從Armourbit的電池盒, 以USB介面進行引出(如下圖)。
 #### **2. 與Robotbit Edu連接**[¶](broken://pages/ZvCKyUY1YA994l3hZnao)
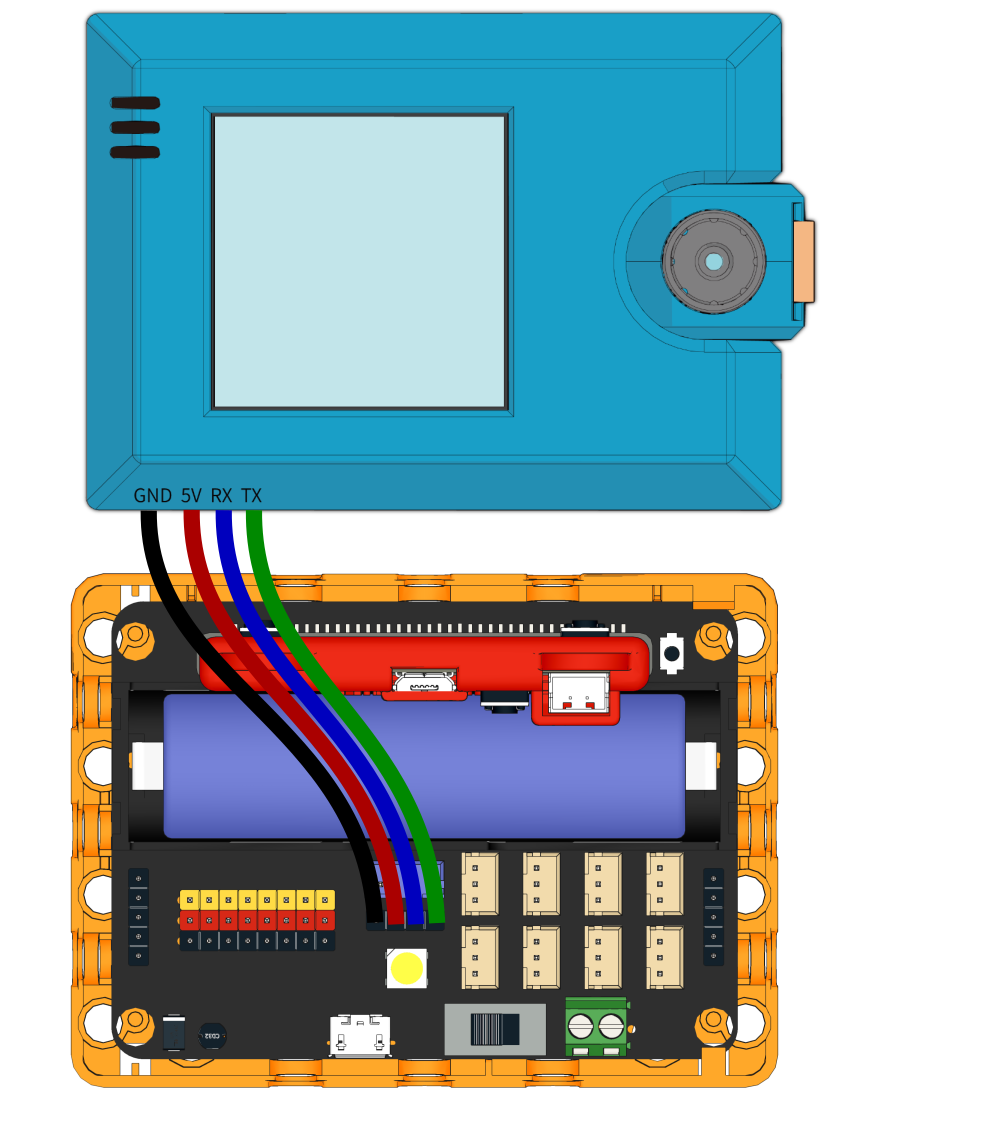
由於Robobit Edu上提供了5V 的輸出接口, 我們可以不用再接USB線為KOI 供電。
Robotbit Edu上已經提供了4pin的通訊接口,我們只需要將KOI連接到通訊接口就可以了。
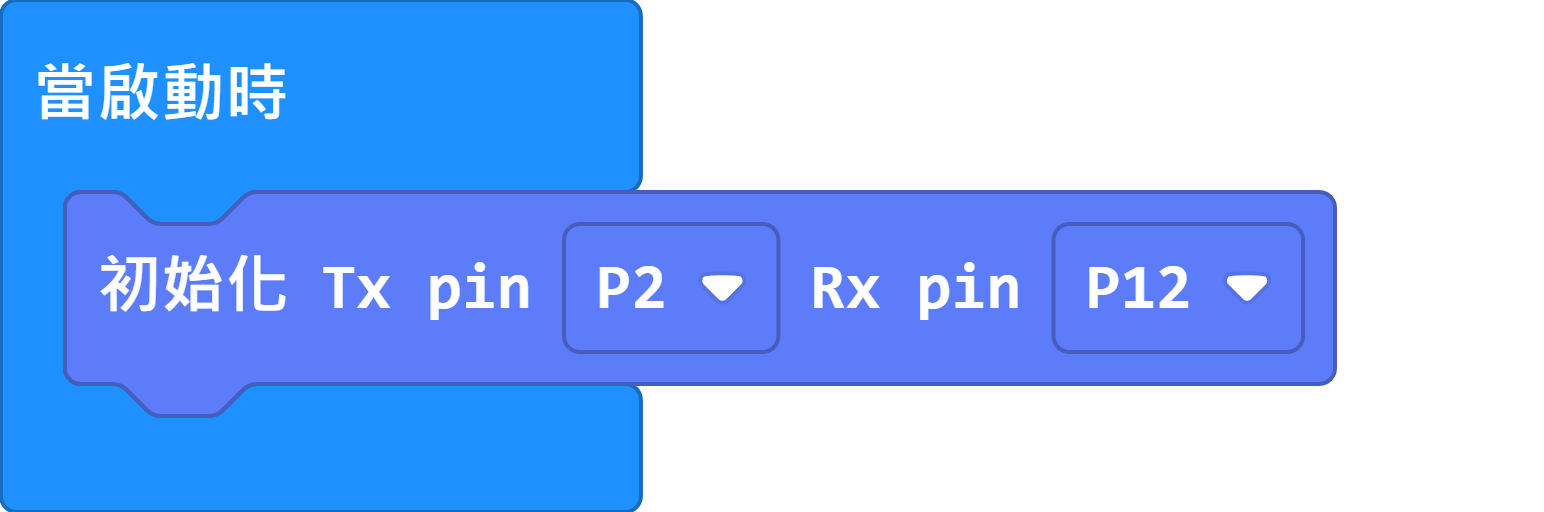
由於Robotbit Edu的通訊接口使用了P2與P12,我們在MakeCode裡面就要相應地選擇引腳。
#### **2. 與Robotbit Edu連接**[¶](broken://pages/ZvCKyUY1YA994l3hZnao)
由於Robobit Edu上提供了5V 的輸出接口, 我們可以不用再接USB線為KOI 供電。
Robotbit Edu上已經提供了4pin的通訊接口,我們只需要將KOI連接到通訊接口就可以了。
由於Robotbit Edu的通訊接口使用了P2與P12,我們在MakeCode裡面就要相應地選擇引腳。
 #### **3. 與Robotbit連接**[¶](broken://pages/ZvCKyUY1YA994l3hZnao)
由於Robobit 上提供了5V 的輸出接口, 我們可以不用再接USB線為KOI 供電。
但用家必須**注意**, 在接駁4條杜邦線時, 要格外留意**5V** 及**GND** 的插線,
**xxx 切勿反接 xxx**[**¶**](broken://pages/ZvCKyUY1YA994l3hZnao)
否則KOI有機會不能再運作了 >.<
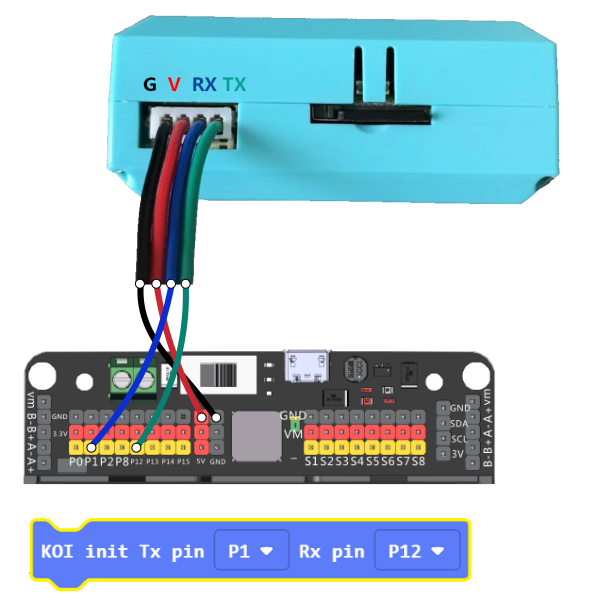
使用隨盒附送的4pin 線, 白色大插頭插入KOI 中
另一端顏色順序為 - 黑, 紅, 藍, 綠
分別對應Robotbit 上 - GND, 5V, P1(TX), P12(RX)
```
KOI的藍色線只可以接類比引腳(Pin0-2)!使用Pin0的話請拔除蜂鳴器跳線帽。
```
#### **3. 與Robotbit連接**[¶](broken://pages/ZvCKyUY1YA994l3hZnao)
由於Robobit 上提供了5V 的輸出接口, 我們可以不用再接USB線為KOI 供電。
但用家必須**注意**, 在接駁4條杜邦線時, 要格外留意**5V** 及**GND** 的插線,
**xxx 切勿反接 xxx**[**¶**](broken://pages/ZvCKyUY1YA994l3hZnao)
否則KOI有機會不能再運作了 >.<
使用隨盒附送的4pin 線, 白色大插頭插入KOI 中
另一端顏色順序為 - 黑, 紅, 藍, 綠
分別對應Robotbit 上 - GND, 5V, P1(TX), P12(RX)
```
KOI的藍色線只可以接類比引腳(Pin0-2)!使用Pin0的話請拔除蜂鳴器跳線帽。
```
 **重要事項: 黑 (GND) 及 紅(5V) 切勿反接!!!**[**¶**](broken://pages/ZvCKyUY1YA994l3hZnao)
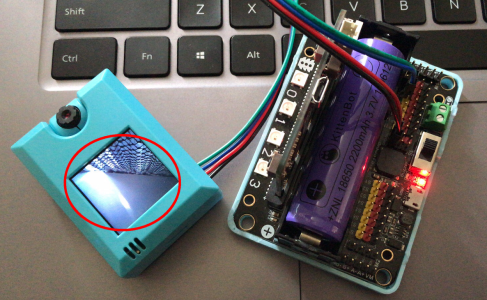
再次*檢查接線無誤* 後, 就可以打開Robitbit 的開關, 便會看到KOI 的屏幕顯示出鏡頭當下所拍到的畫面。
**重要事項: 黑 (GND) 及 紅(5V) 切勿反接!!!**[**¶**](broken://pages/ZvCKyUY1YA994l3hZnao)
再次*檢查接線無誤* 後, 就可以打開Robitbit 的開關, 便會看到KOI 的屏幕顯示出鏡頭當下所拍到的畫面。
 ### **準備Makecode編程**[¶](broken://pages/ZvCKyUY1YA994l3hZnao)
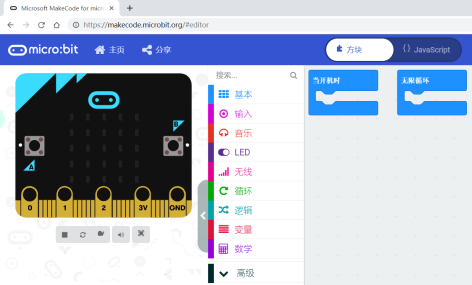
 可以使用線上版本的Makecode
[https://makecode.microbit.org](https://makecode.microbit.org/)
可以使用線上版本的Makecode
[https://makecode.microbit.org](https://makecode.microbit.org/)
 #### **加入插件 (extension)**[¶](broken://pages/ZvCKyUY1YA994l3hZnao)
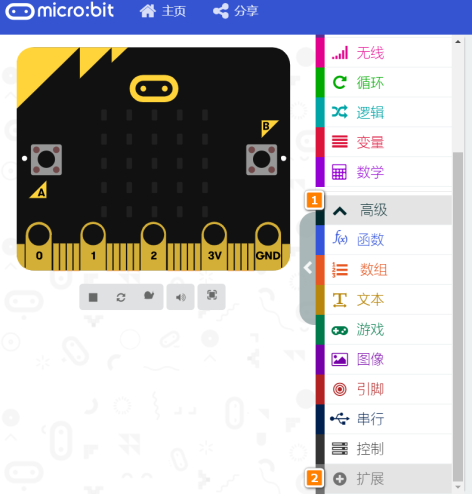 #### 加載KOI插件:[¶](broken://pages/ZvCKyUY1YA994l3hZnao)
#### 在擴展頁直接搜尋KOI (KOI已經過微軟認證,可以直接搜尋)[¶](broken://pages/ZvCKyUY1YA994l3hZnao)
#### 加載KOI插件:[¶](broken://pages/ZvCKyUY1YA994l3hZnao)
#### 在擴展頁直接搜尋KOI (KOI已經過微軟認證,可以直接搜尋)[¶](broken://pages/ZvCKyUY1YA994l3hZnao)
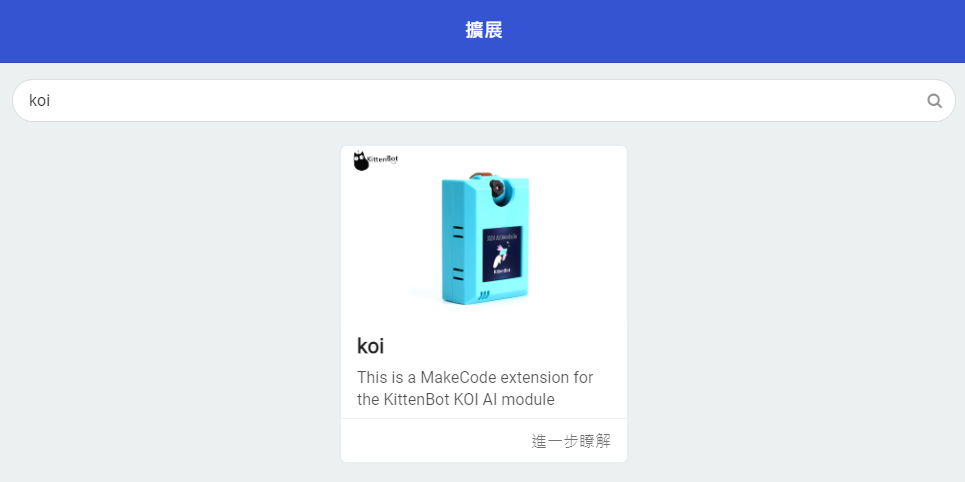 #### 你亦可以用插件地址搜尋[¶](broken://pages/ZvCKyUY1YA994l3hZnao)
KOI插件:
KOI 插件成功載入,如圖所示
#### 你亦可以用插件地址搜尋[¶](broken://pages/ZvCKyUY1YA994l3hZnao)
KOI插件:
KOI 插件成功載入,如圖所示
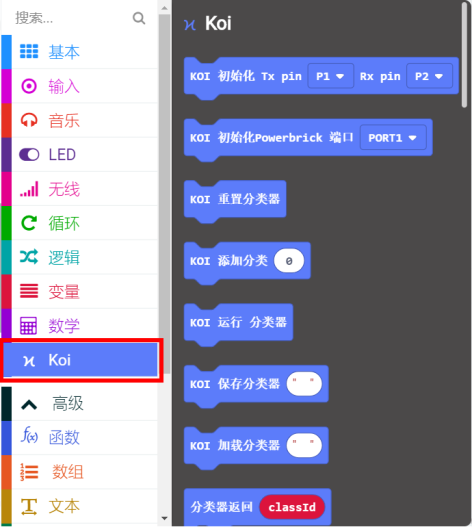 ### **積木介紹**
#### **連接初始化**[¶](broken://pages/ZvCKyUY1YA994l3hZnao)
### **積木介紹**
#### **連接初始化**[¶](broken://pages/ZvCKyUY1YA994l3hZnao)
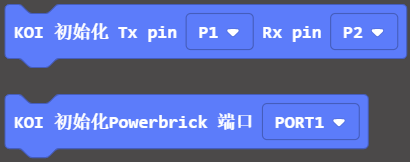 **第一個積木**——針對是Robotbit或者其它Microbit擴展板
**第二個積木**——針對是能量魔塊的Armourbit,新手推薦使用能量魔塊套件
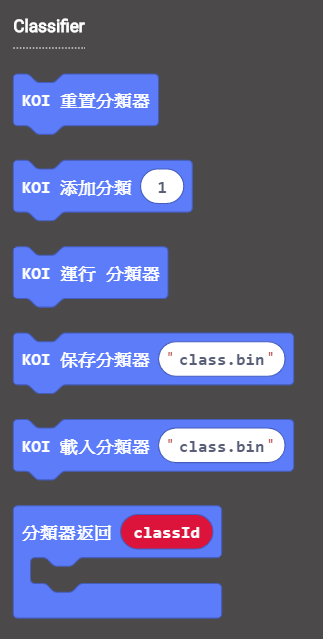
#### **Classifier 分類器**[¶](broken://pages/ZvCKyUY1YA994l3hZnao)
如果大家熟悉PC端的KittenbotML5外掛程式,那麼理解KOI的Classifier 積木塊也就很簡單了。
Classifier 分類器用於自訂學習分辨特定的物體或者場景等等。
**第一個積木**——針對是Robotbit或者其它Microbit擴展板
**第二個積木**——針對是能量魔塊的Armourbit,新手推薦使用能量魔塊套件
#### **Classifier 分類器**[¶](broken://pages/ZvCKyUY1YA994l3hZnao)
如果大家熟悉PC端的KittenbotML5外掛程式,那麼理解KOI的Classifier 積木塊也就很簡單了。
Classifier 分類器用於自訂學習分辨特定的物體或者場景等等。
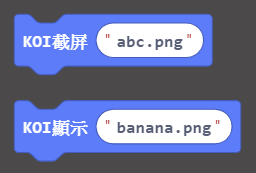
 #### **截圖與顯示**[¶](broken://pages/ZvCKyUY1YA994l3hZnao)
使用此功能前,先檢查記憶體卡是否已經插在KOI魔塊上,否則截圖無法保存。
調用截圖積木塊,會以“XXX.png”存儲一張圖片到記憶體卡中 (XXX 為自定義字無空隔字串)。**如無記憶體卡,顯示截圖失敗!**
調用顯示積木塊,會在記憶體卡中尋找一張以“XXX.png”為名的圖片,並以顯示,顯示持續1S左右。若記憶體卡中無此圖片,則螢幕回饋資訊無法無法打開此檔。
#### **截圖與顯示**[¶](broken://pages/ZvCKyUY1YA994l3hZnao)
使用此功能前,先檢查記憶體卡是否已經插在KOI魔塊上,否則截圖無法保存。
調用截圖積木塊,會以“XXX.png”存儲一張圖片到記憶體卡中 (XXX 為自定義字無空隔字串)。**如無記憶體卡,顯示截圖失敗!**
調用顯示積木塊,會在記憶體卡中尋找一張以“XXX.png”為名的圖片,並以顯示,顯示持續1S左右。若記憶體卡中無此圖片,則螢幕回饋資訊無法無法打開此檔。
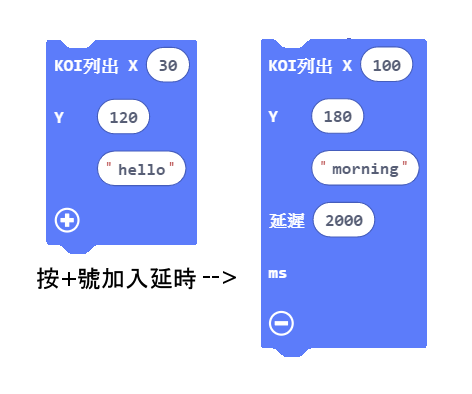
 #### **顯示資訊**[¶](broken://pages/ZvCKyUY1YA994l3hZnao)
使用列出積木,可在螢幕指定的x, y 上顯示資訊; 資訊顯示約1秒後便會自動消失。
我們也可按需要加入延時, 加長資訊顯示時間。
#### **顯示資訊**[¶](broken://pages/ZvCKyUY1YA994l3hZnao)
使用列出積木,可在螢幕指定的x, y 上顯示資訊; 資訊顯示約1秒後便會自動消失。
我們也可按需要加入延時, 加長資訊顯示時間。
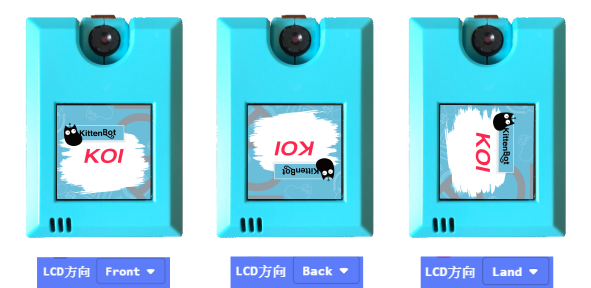
 #### **設置螢幕顯示**[¶](broken://pages/ZvCKyUY1YA994l3hZnao)
前置(Front), 後置(Back)及平放(Land) 3種選擇,因為模組無法自動檢測當前攝像頭是前置或者後置的狀態。因此需要手動選擇設置, 螢幕會根據選擇進行畫面翻轉處理。
#### **設置螢幕顯示**[¶](broken://pages/ZvCKyUY1YA994l3hZnao)
前置(Front), 後置(Back)及平放(Land) 3種選擇,因為模組無法自動檢測當前攝像頭是前置或者後置的狀態。因此需要手動選擇設置, 螢幕會根據選擇進行畫面翻轉處理。
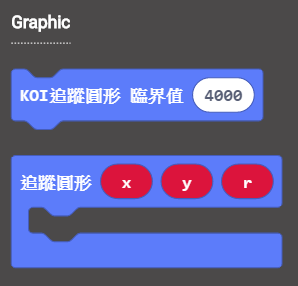
 #### **圓形追蹤**[¶](broken://pages/ZvCKyUY1YA994l3hZnao)
閾值越大,排除干擾越強,但閾值太大,圓形檢測會越難。
x與y為檢測圓形在螢幕上的橫縱坐標,r為檢測所得之圓形半徑。
#### **圓形追蹤**[¶](broken://pages/ZvCKyUY1YA994l3hZnao)
閾值越大,排除干擾越強,但閾值太大,圓形檢測會越難。
x與y為檢測圓形在螢幕上的橫縱坐標,r為檢測所得之圓形半徑。
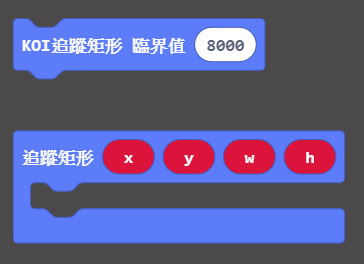
 #### **方形追蹤**[¶](broken://pages/ZvCKyUY1YA994l3hZnao)
與圓形追蹤功能同理
w與h為檢測矩形時,屏幕上框選出方形的線框長度與寬度。
#### **方形追蹤**[¶](broken://pages/ZvCKyUY1YA994l3hZnao)
與圓形追蹤功能同理
w與h為檢測矩形時,屏幕上框選出方形的線框長度與寬度。
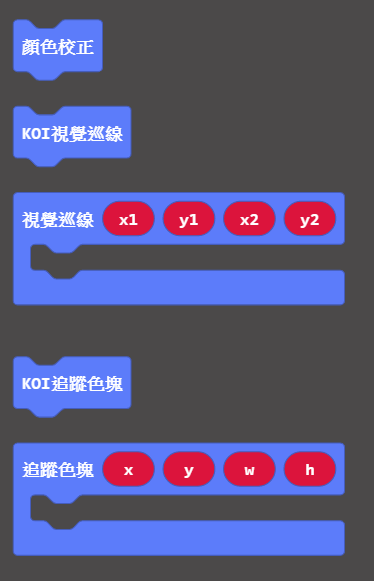
 #### **顏色巡線與顏色追蹤**[¶](broken://pages/ZvCKyUY1YA994l3hZnao)
顏色巡線與顏色追蹤前,必須進行顏色校準
視覺巡線對應的座標是直線段的兩點座標(x1,y1)(x2,y2)
色塊參數與矩形追蹤同理
#### **顏色巡線與顏色追蹤**[¶](broken://pages/ZvCKyUY1YA994l3hZnao)
顏色巡線與顏色追蹤前,必須進行顏色校準
視覺巡線對應的座標是直線段的兩點座標(x1,y1)(x2,y2)
色塊參數與矩形追蹤同理
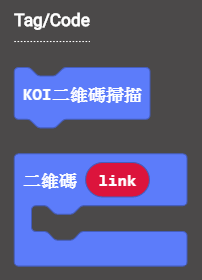
 #### **二維碼**[¶](broken://pages/ZvCKyUY1YA994l3hZnao)
掃描檢測二維碼,返回二維碼結果。
二維碼寬度要求不小於3.5cm,一般微信名片二維碼大於3.5cm。若二維碼太小,會因解析度太小的原因無法識別。
#### **二維碼**[¶](broken://pages/ZvCKyUY1YA994l3hZnao)
掃描檢測二維碼,返回二維碼結果。
二維碼寬度要求不小於3.5cm,一般微信名片二維碼大於3.5cm。若二維碼太小,會因解析度太小的原因無法識別。
 #### **條碼**[¶](broken://pages/ZvCKyUY1YA994l3hZnao)
掃描檢測條碼,返回條碼結果
條碼要求不小於3.5cm。若條碼太小,會因解析度太小的原因無法識別。
#### **條碼**[¶](broken://pages/ZvCKyUY1YA994l3hZnao)
掃描檢測條碼,返回條碼結果
條碼要求不小於3.5cm。若條碼太小,會因解析度太小的原因無法識別。
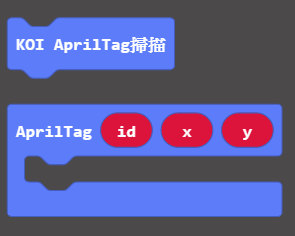
 #### **Apriltag**[¶](broken://pages/ZvCKyUY1YA994l3hZnao)
Apriltag簡單理解為簡化版的二維碼,Apriltag還能監測出座標與其三軸的旋轉角度。
Apriltag廣泛應用到機器人視覺識別的場景中
#### **Apriltag**[¶](broken://pages/ZvCKyUY1YA994l3hZnao)
Apriltag簡單理解為簡化版的二維碼,Apriltag還能監測出座標與其三軸的旋轉角度。
Apriltag廣泛應用到機器人視覺識別的場景中
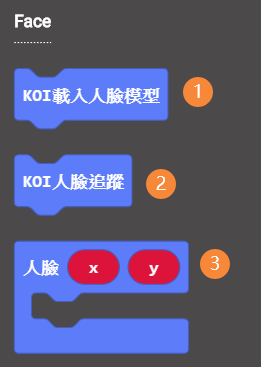
 #### **人臉模型yolo檢測**[¶](broken://pages/ZvCKyUY1YA994l3hZnao)
1. 初始化時載入人臉模型後, 才能啟動人臉追蹤功能。
2. 啟動人臉追蹤功能,檢測到人臉即返回人臉座標xy。
3. 當檢測到人臉,返回人臉的座標。
#### **人臉模型yolo檢測**[¶](broken://pages/ZvCKyUY1YA994l3hZnao)
1. 初始化時載入人臉模型後, 才能啟動人臉追蹤功能。
2. 啟動人臉追蹤功能,檢測到人臉即返回人臉座標xy。
3. 當檢測到人臉,返回人臉的座標。
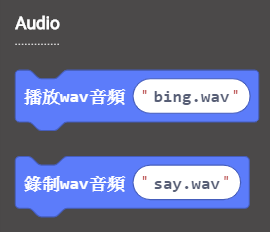
 #### **錄製與播放音訊**[¶](broken://pages/ZvCKyUY1YA994l3hZnao)
由於錄製的wav 檔是儲存在micro SD 卡中, 播放功能亦是由記憶卡讀取wav檔, 因此使用時要求在KOI開機前, 記憶體卡已經插好,否則不能進行錄音與播放。
**記憶體卡不支援hot plug,請在啟動KOI前插好記憶卡**
#### **錄製與播放音訊**[¶](broken://pages/ZvCKyUY1YA994l3hZnao)
由於錄製的wav 檔是儲存在micro SD 卡中, 播放功能亦是由記憶卡讀取wav檔, 因此使用時要求在KOI開機前, 記憶體卡已經插好,否則不能進行錄音與播放。
**記憶體卡不支援hot plug,請在啟動KOI前插好記憶卡**
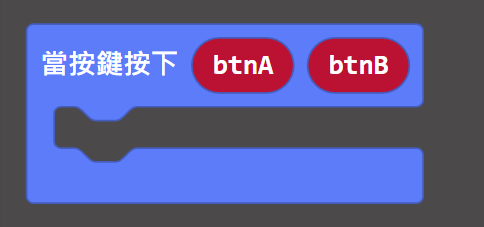
 #### **KOI的AB按鍵檢測**[¶](broken://pages/ZvCKyUY1YA994l3hZnao)
按鍵檢測事件,btn1與btn2分別是按鍵的狀態值; 當按下鬆開會傳回迅間值1,閒置狀態為0。
#### **KOI的AB按鍵檢測**[¶](broken://pages/ZvCKyUY1YA994l3hZnao)
按鍵檢測事件,btn1與btn2分別是按鍵的狀態值; 當按下鬆開會傳回迅間值1,閒置狀態為0。
 ### **插件版本與更新**[¶](broken://pages/ZvCKyUY1YA994l3hZnao)
KOI插件可能會不定時推出更新,改進功能。亦有時候我們可能需要轉用舊版插件才可使用某些功能。
詳情請參考: [Makecode插件版本更換](/programmingplatforms/makecode/makecodeextupdate.md)
### **插件版本與更新**[¶](broken://pages/ZvCKyUY1YA994l3hZnao)
KOI插件可能會不定時推出更新,改進功能。亦有時候我們可能需要轉用舊版插件才可使用某些功能。
詳情請參考: [Makecode插件版本更換](/programmingplatforms/makecode/makecodeextupdate.md)